Struggling with cluttered glue bottles, lost finishes, and cold temperatures ruining your adhesives? This compact, space-saving cabinet is the perfect solution for woodworkers looking to organize and protect their glues, stains, and finishes.
Designed with a clam-style fold-out system, this cabinet maximizes storage while keeping a small footprint in your shop. Plus, with a hidden front compartment for brushes, tape, and finishing tools, everything stays within reach.
And when cold weather hits? Simply unhook the cabinet from its French cleat and bring it inside, preventing your finishes and adhesives from freezing or going bad.
This project was inspired by Steve Ramsey’s design but modified to add more organization, portability, and protection.
ATTENTION: These plans are yours to use…they are offered as a gift from me to you. You have every right to use them to make this project for yourself, but please, do not sell or give these plans away as your own. I make absolutely no money off of these so I would appreciate those who view these plans to abide by basic copyright laws.
As an amazon associate I earn from qualifying purchases.
Step by step instructions
2.1. Materials
An overview of the materials required for this layer of the project.
Click image to see this step on youtube
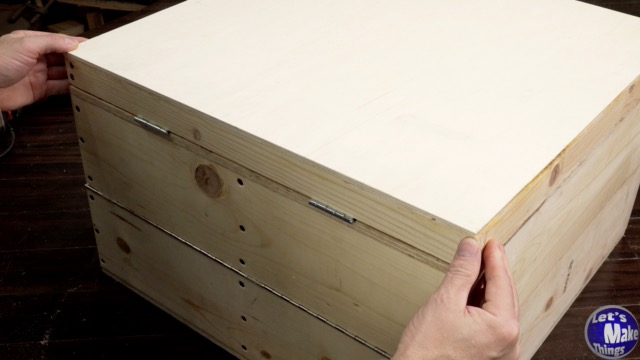
2.2. Door frame
Just like the last layer, we’ll build the cabinet door frame using butt joints, applying glue sizing on each end for a strong, durable bond.
To avoid accidentally gluing the frame to the cabinet shelf, apply painter’s tape as a protective barrier.
How to Attach the Plywood to the Door Frame:
Apply wood glue evenly along the frame edges.
Position the plywood onto the door frame for a flush fit.
Use the cabinet itself as weight to ensure even pressure.
Add additional weight (such as a bucket of water) to keep the plywood flat and fully bonded as the glue dries.
By following these steps, you’ll create a sturdy and well-aligned cabinet door that’s ready for finishing.
Click image to see this step on youtube
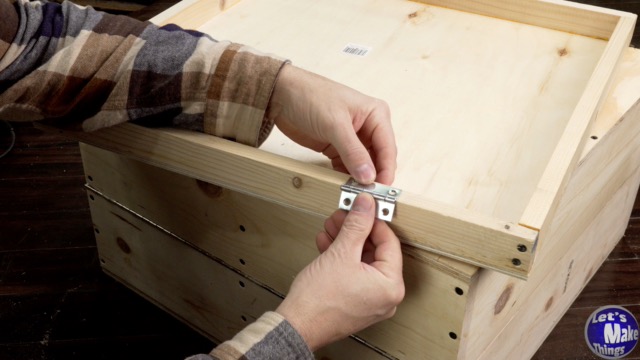
2.3. Lots of hinges
Now it’s time to install the hinges to allow the cabinet door to open and close smoothly.
Hinge Placement & Locking Mechanism:
Attach two hinges on one side to secure the door to the cabinet.
Add a third hinge as a locking mechanism.
This hinge, paired with a hitch pin, will keep the door closed securely.
Alternative Locking Option:
Instead of a hitch pin, you could use eye hooks with a latch, but the hinge method ensures the door stays level with the cabinet frame.
By using a hinge for locking, the door remains aligned and sturdy while providing an easy-to-use secure closure.
Click image to see this step on youtube
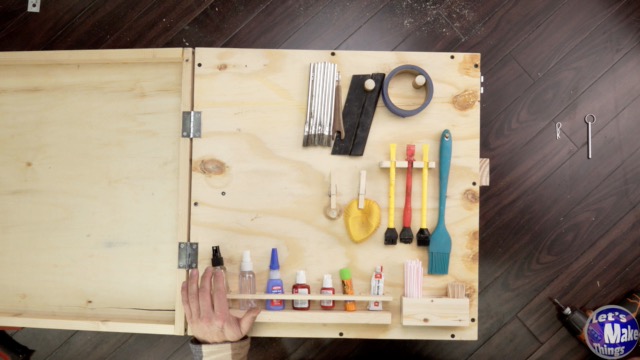
2.4. Shadow boxing
This step is all about organizing your essential tools by adding shadow boxing to the front of the cabinet. This keeps your glue and finishing tools easily accessible and ensures they always have a designated place.
How to Set Up a Simple Shadow Box System:
Decide what tools you use most for gluing and finishing.
Plan the layout by arranging them in a way that makes sense for quick access.
Attach holders, hooks, or cutouts that fit each tool.
You don’t have to be overly creative—just think about how each tool will stay in place.
It might seem like an extra step, but having your glue brushes, spreaders, and finish rags within arm’s reach saves time and frustration. No more hunting for tools—everything is right where you need it!
Click image to see this step on youtube
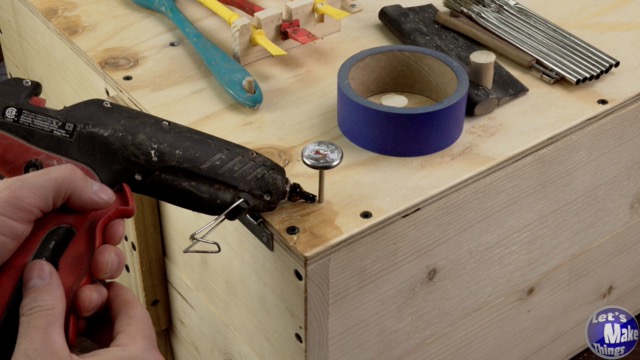
2.5. Thermometer
To protect your glues and finishes from freezing, I installed a thermometer inside the cabinet. Even a few cold nights can ruin materials, so keeping an eye on the temperature is crucial.
How to Install the Thermometer:
Place it on the top of the cabinet – This keeps it out of the way of stored items while still being easy to check.
Prevent dust buildup – I used a toilet paper roll, cut to match the cabinet thickness, and hot-glued it to the inside.
This acts as a dust barrier, ensuring the thermometer remains readable and functional.
With this setup, you’ll always know if your glue and finishes are safe—no surprises when the temperature drops!