Table saw blade tear out happens at the bottom edge of our stock when ripping or cross cutting with a table saw. If you want to prevent it from happening, a sharp blade free of residue is the way to go. The second best way is to use a zero clearance insert. Zero clearance inserts use to be made by dropping a piece of stock into a slot on the table top and raising the blade with the machine on to make the cut. Riving knives have made it a little more complicated…but I’m going to show you a really quick way to make one with these free plans. If you don’t have a riving knife, I’m going to show you how you can add a splitter.
watch all steps in this video before starting
Please use the material and tool list below as a guide to finding the products locally.
As an amazon associate I earn from qualifying purchases.
Step by step instructions
1. Cutting to Zero
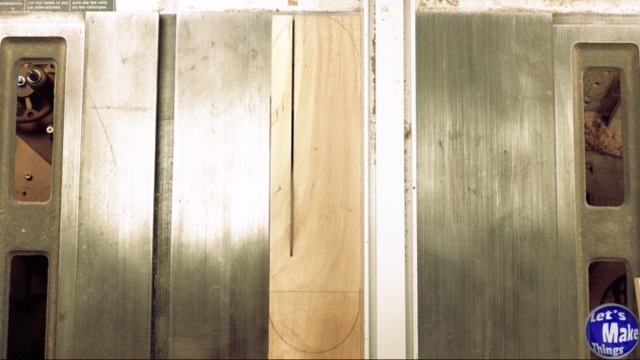
We’ll start off by first cutting our plywood to size. My plywood was just shy of the thickness of the insert (.47 was the exact thickness) and so I used a planer to bring it down slightly. I cut the width of my insert by setting it to the inside of my blade against the fence.
Next I brought the fence to the insert, locked it and cut a groove, but only to the furthest width of the front part of my saw.
Click image to see this step on youtube
2. Gap discussion
If you don’t plan on using a splitter (for example, if your table saw has a riving knife already), you can skip down to step 4. If you do plan on using a splitter, you’ll want to use either a piece of steel or wood that’s the same thickness as your table saw blade. Fortunately, if you’re a 3/32 inch blade user, a 12 gauge piece of steel works to fill the gap. Both 1/8″ or 1/16″ steel can also be purchased and used, but we’ll get into that in a little bit.
Click image to see this step on youtube
3. splitter (Part 1)
The materials list above may seem a little confusing, but we need to consider that there are 3 different common blade thicknesses used for table saws. There’s an 1/8″ blade (the thickest), 3/32″ blade and a 1/16″ blade. Fortunately, all 3 sizes are easy to get ahold of in most hardware stores. The middle size, the 3/32″ blade, can easily be matched with 12 gauge steel.
Click image to see this step on youtube
4. Cutting to shape
After we’ve cut our kerf, we’ll take the insert that came with the saw and trace it onto our new stock. If you don’t have a bandsaw, a coping saw will work fine. If you’re not interested in using a splitter, move on to step 7.
Click image to see this step on youtube
5. Splitter (Part 2)
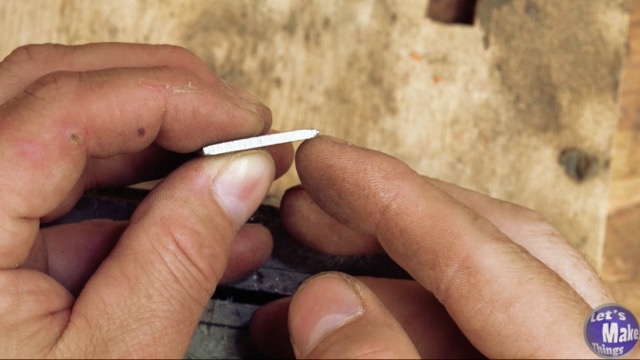
I cut an inch piece of steel off of a piece of flat steel that’s 3/32 of an inch. I used a file to sand any sharp areas off and then created a splitter shape that my stock would easily slide through. I roughed up the steel a little on the lower part that would fit into the plywood and added epoxy.
Click image to see this step on youtube
6. Sanding to fit
Now to check to see if it fits. If you’re not using a splitter, head over to step 7 before coming back and finalizing with this step.
Now that we have the gap filled, we’ll test to see if it fits. I used a pencil to mark the rough edges by tracing the insert and sending the edges with my sander. If you don’t have a sander a piece of sandpaper works too. When you’re done, you don’t want to have any play with the insert…it should fit snug in the table saw table.
Click image to see this step on youtube
7. An easy gap fill
If you don’t plan on making a splitter, to fill the gap you only need two shims. You’ll slide a shim in from the back and the front until they meet and glue them together. Use a hand saw of some kind to cut it flush with the surface.
Thank you so much for looking over this free step by step. If you have any questions, my email has been provided below!
Click image to see this step on youtube
Tip Jar
If you enjoyed or found this useful, throw me a tip →
To support me with patreon, click here → Patreon
Click here to Subscribe to me on youtube → Youtube
If you found any errors on the page, please use my email below and contact me!